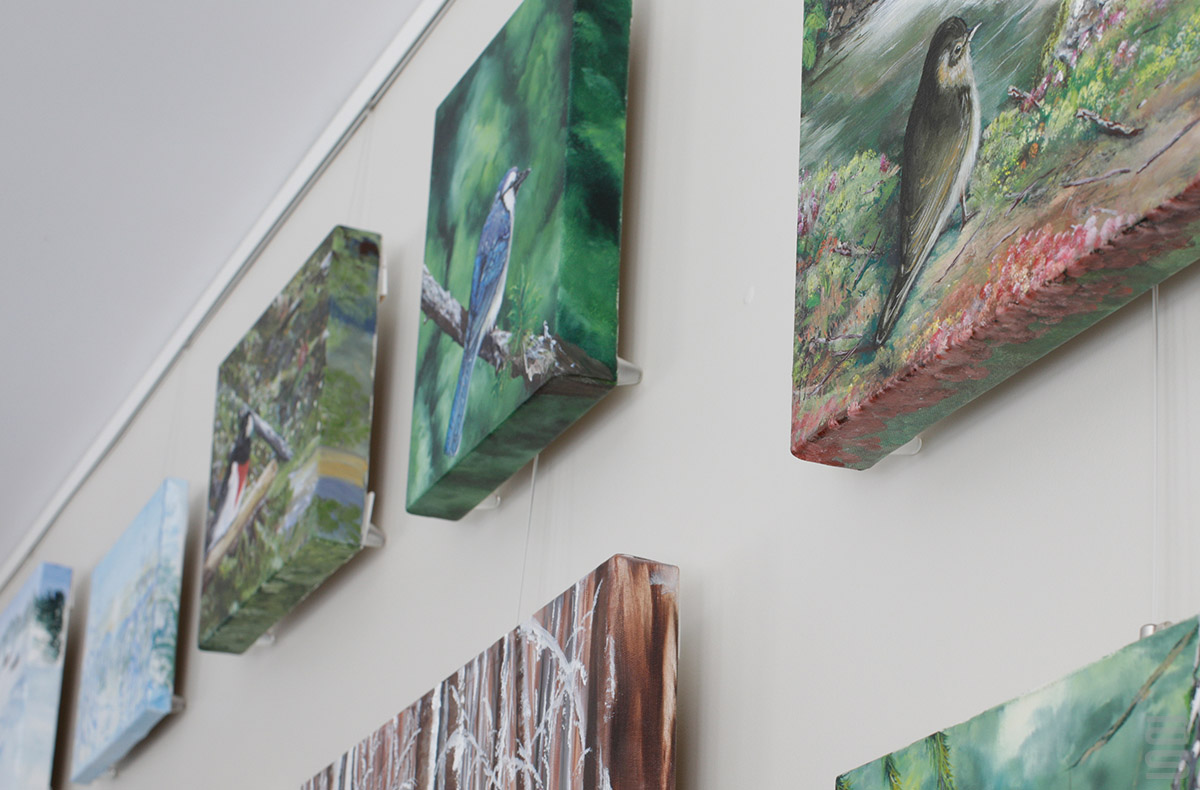
Why talk about stabilizers?
Perfect framing can still look imperfect if the piece doesn’t sit right on the wall. The two most common complaints:
1. The top of the frame leans forward (the “fall-away” look).
2. Teeter-totter at the bottom corners (one corner touches the wall while the other kicks out).
If you use a rail-and-cable system - or even traditional two-hook hanging - these issues are mechanical, not aesthetic. The fix is simple: the right picture frame hanging hardware. In this guide, we’ll show how frame bumpers, frame stabilizers, and counter-weight stabilizers work together to eliminate lean, control tilt, and keep multi-frame layouts looking crisp and professional.
The problem, visualized
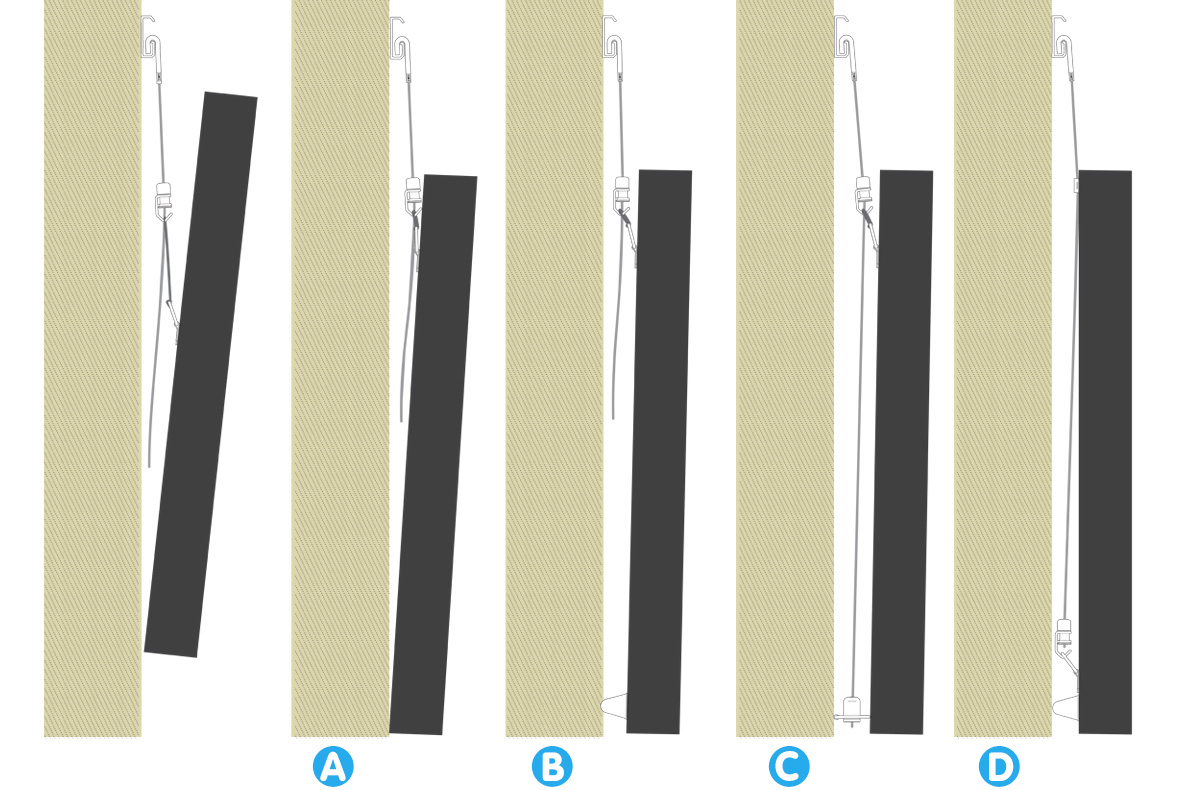
Refer to the A–D diagram:
 Original issue: The wire is set too high or too loose. The frame rotates around the wire contact point and the top leans out.
 Tighten/relocate wire: Improves the angle, but some lean remains - especially with light, short, or thick frames, and add Frame Bumpers.
- Add a Frame Stabilizer (Cable or Rod): It balances the distance of both lower frame corners to the wall, about 1in from the wall surface.
- Add a counter-weight stabilizer, (Cable or Rod): The frame “floats” evenly from the wall - flush, level, and consistent with neighboring pieces.
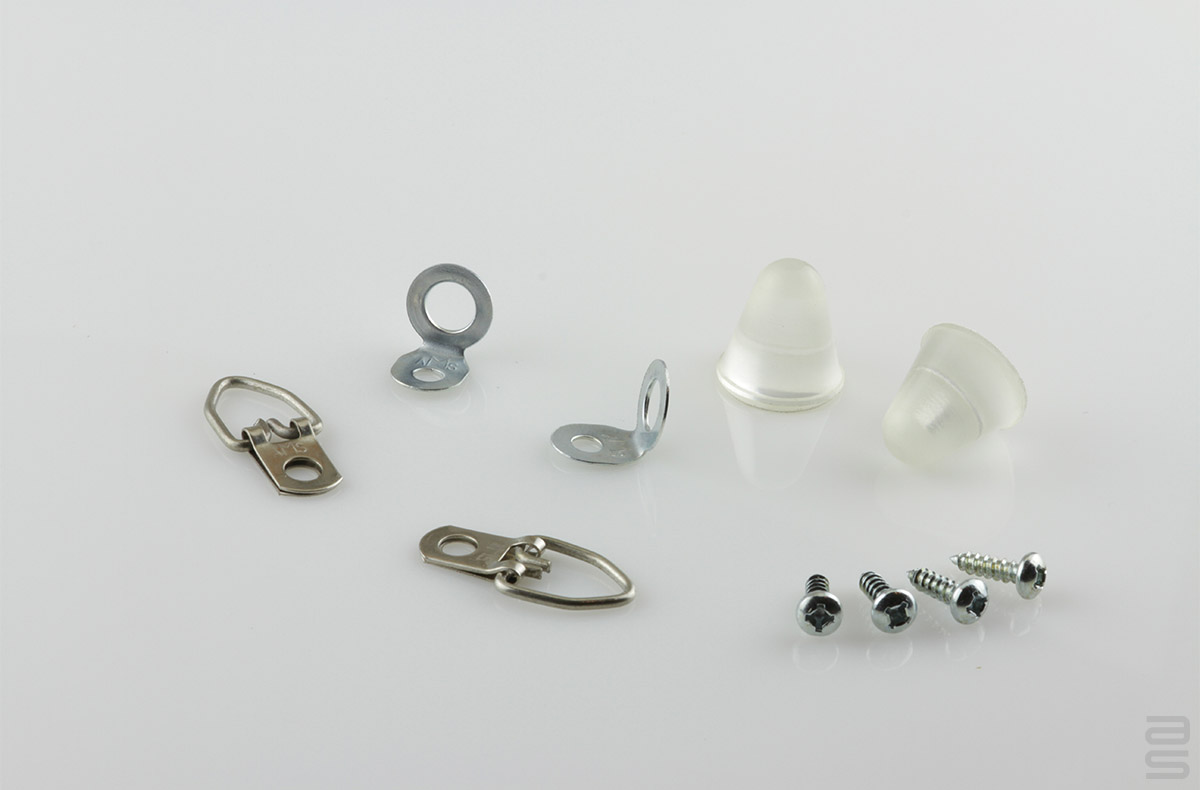
Meet the hardware
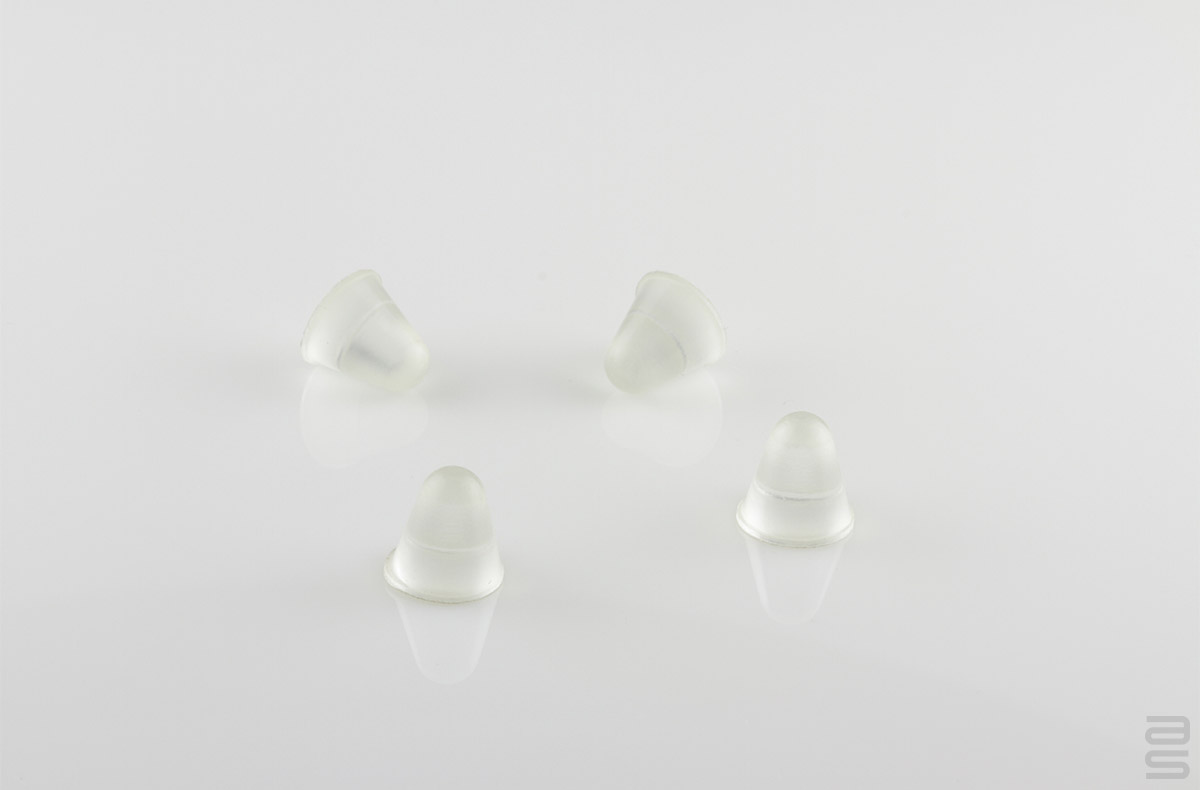
![]() Frame Bumpers - the smallest, fastest fix
Frame Bumpers - the smallest, fastest fix
These clear polyurethane spacers (¾ in. tall × ¾ in. diameter) stick to the back lower corners of your frame:
- Push corners out to counter mild lean
- Protect paint and drywall from scuffs
- Dampen vibration in high-traffic areas
How to use: Clean the back of the frame, peel-and-stick, and press firmly for a few seconds. One pair per artwork is typical. Frame bumpers are inexpensive insurance, even when everything else is correct.
Best for: Quick fixes, light or medium frames, stacked displays where you need consistent spacing at the wall.
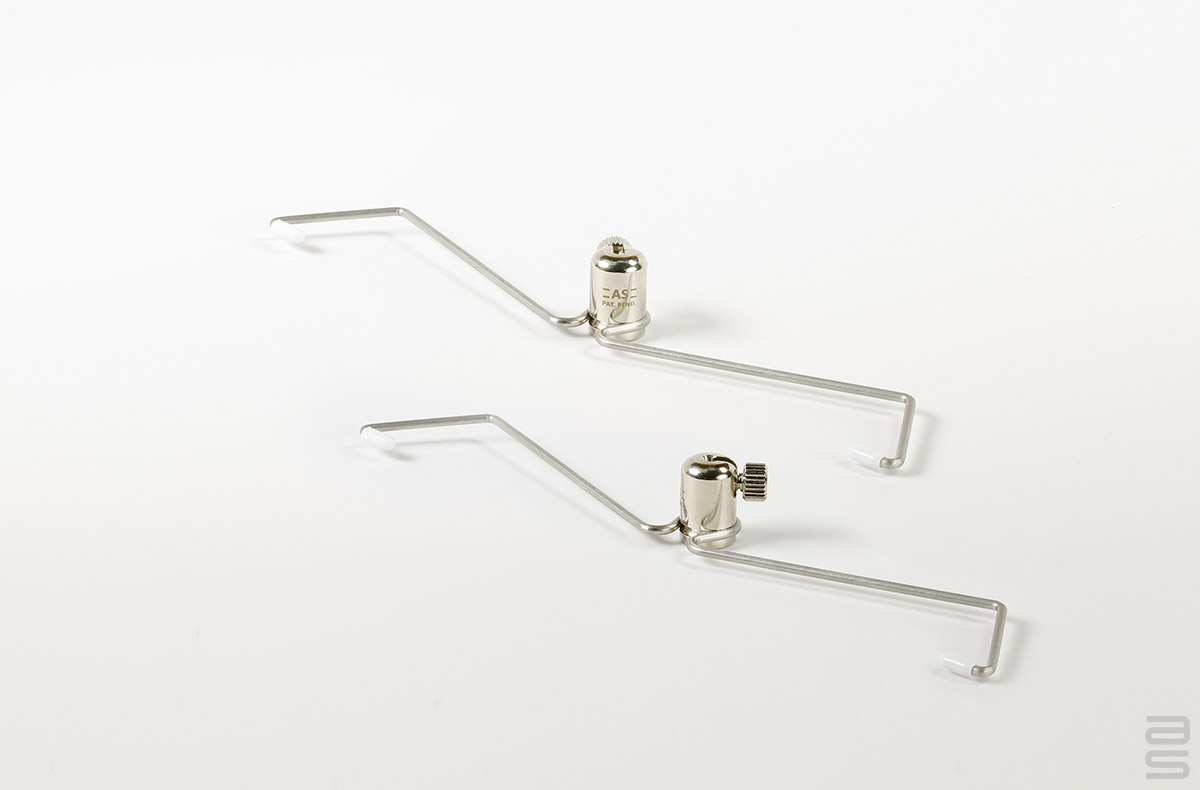
![]() Frame Stabilizers - the invisible leveler (Cable or Rod)
Frame Stabilizers - the invisible leveler (Cable or Rod)
A Frame Stabilizer sits on your hanging Cable or Rod and hides behind the bottom rail of the frame. Think of it as a second support point - complementing the wire at the top - so the piece doesn’t pivot forward.
Why it works
With a single upper wire, the frame acts like a pendulum. By adding a stabilizer behind the bottom rail, you give the piece a second “contact” that shares the load and prevents rotation. The face of the artwork stays vertical, creating that clean, floating look galleries love.
When it’s essential:
- Vertical stacks on a single cable: Without stabilizers, all but the bottom frame will teeter.
- Short or shallow frames: Less height means less natural resistance to pitch.
- Grids and donor walls: Micro-tuning alignment across many pieces.
Options:
- Cable or Rod versions
- Two sizes to match frame depth and spacing
- Nearly invisible from normal viewing distances
Pro tip: If you use a single cable to hang two or more frames in a column, add a stabilizer behind every frame except the lowest one.
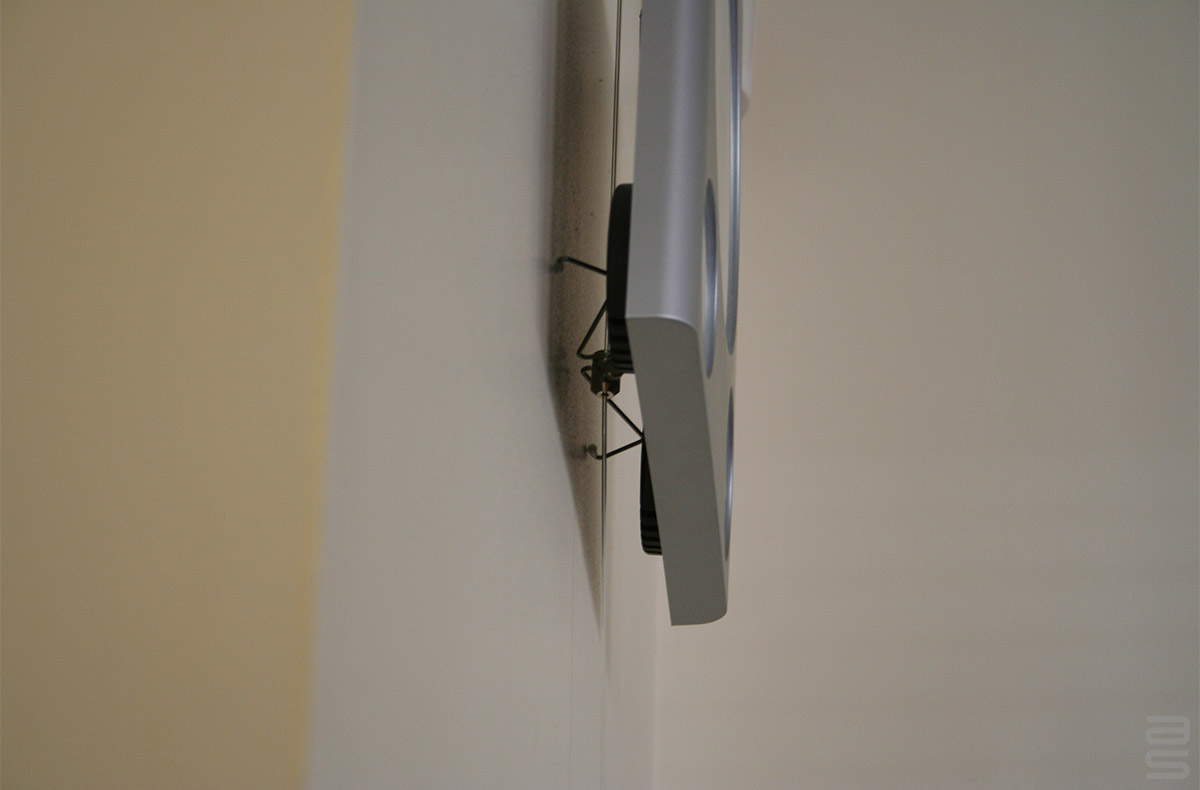

![]() Counter-Weight Stabilizers - for stubborn frames (Cable or Rod)
Counter-Weight Stabilizers - for stubborn frames (Cable or Rod)
Some frames refuse to behave - especially short, very light, or extra-thick pieces hung from two cables (one at each side). The Counter-Weight Stabilizer attaches to the lower back of the frame and drops the center of gravity, so the top no longer wants to lean away.
What’s included & how it helps
- Counter-weight assembly: Lowers the center of mass for better balance
- Cable Guides: Keep the frame from pitching forward along the cables
- Large bumpers: Push the lower edge out to align with the top plane
Compatibility notes
- Not for thin aluminum frames or frames too small to accept the mounting screws (appropriate screws may be substituted).
- Best with two-cable hangs. For single-cable setups, use the conventional Frame Stabilizer.
Perfect use cases
- Thick canvases or shadow-box frames
- Tight grid layouts where any lean shows immediately
- Public spaces where frames must stay visually “locked” and tamper-resistant
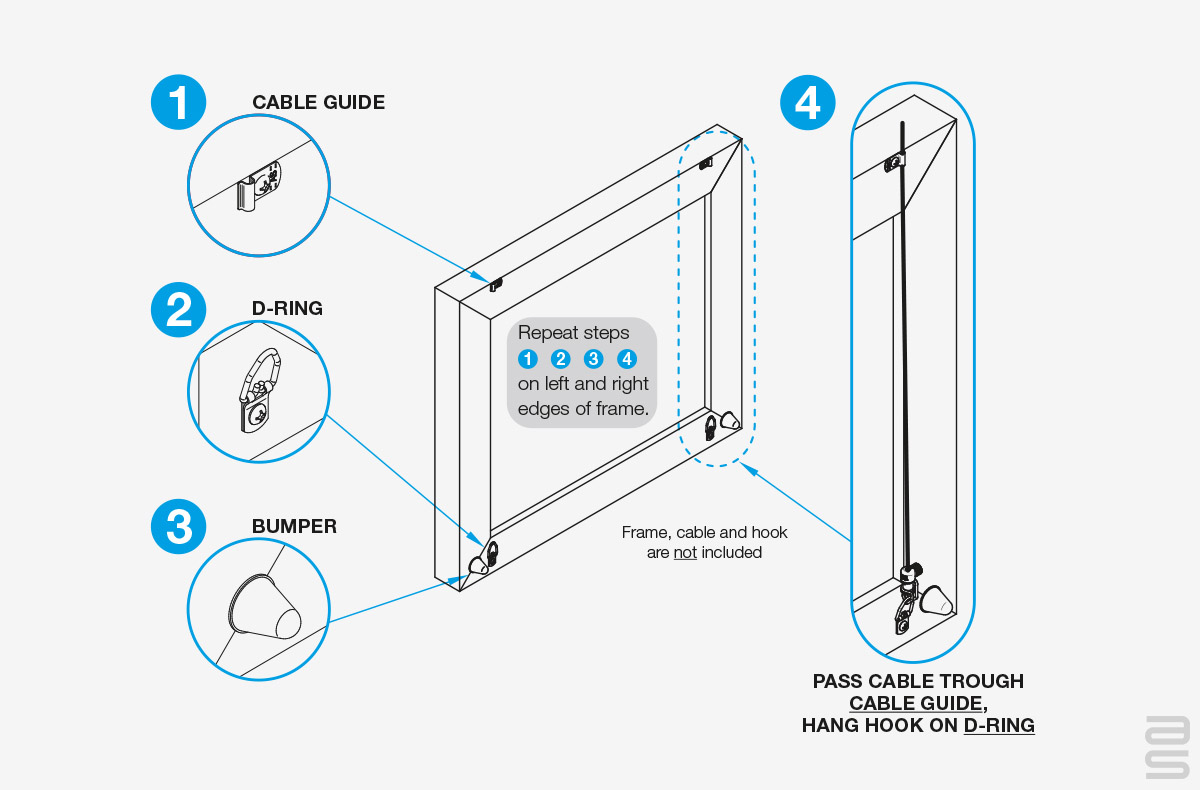
Step-by-step: eliminate lean and teeter-totter
1. Set consistent height
Aim for the artwork center at 57–60 inches from the floor. This “eye-level” standard gives your wall a professional rhythm and minimizes a stair-step appearance across multiple frames.
2. Fix the wire geometry
Place D-rings about the upper third down each frame side and tension the wire so it barely stretches when pulled. A high, slack wire is the #1 cause of forward lean.
3. Add frame bumpers
Install one at each lower corner. They protect, create a uniform stand-off, and often solve mild tilt on their own.
4. Install a Frame Stabilizer (single-cable or single-rod hangs)
Slide the stabilizer onto the dropper, position it behind the lower rail, and micro-adjust the hook height until the face is perfectly vertical.
5. Use a Counter-Weight Stabilizer (two-cable hangs or stubborn frames)
Attach the counter-weight to the lower back of the frame, route the cable guides, add the large bumpers, and fine-tune. The frame should now sit flush and level.
6. Final alignment
Stand 6–8 feet away and sight across the tops and sides. Tiny height tweaks go fast with self-gripping hooks. Lock it in.
Why AS Hanging Display Systems
Complete ecosystem:
Rails, cables, rods, stabilizers, counter-weights, security fittings.
Discreet look:
Hardware fades away; the art takes center stage.
Fast micro-adjustments:
Self-gripping hooks plus stabilizers make perfect alignment painless.
We’re here to help:
From load questions to layout sketches, our team supports your project start to finish.
If you have questions, or wish to learn more about how Frame Stabilizers may improve your visual display, please contact our Customer Support at [email protected], or give us a call at 866 935-6949 (toll free).
When you hang with AS Hanging Systems, you Hang with the Best®
Explore our Picture Hanging Systems built of tracks, cables and hooks.
We offer picture hanging hardware for your residential, commercial and institutional projects.