Product Showcase: Pro Side Clamps
When your display needs to change as often as your message, fixed fasteners and wall-mounted standoffs can feel, well, too fixed.
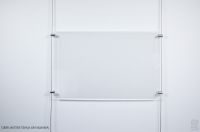
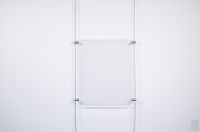
Pro Side Clamps from AS Hanging give you the freedom to suspend rigid panels on cables or cords, build single, or multi-column layouts, and then edit, expand, or relocate the whole composition without drilling new holes in your walls.
Below, we break down how the clamps work, when to choose single vs. double-sided, how to pick the right size, and the small design details that make a big difference in day-to-day use.
We’ll also share install tips, common questions buyers ask online, and two helpful videos that visualize cable-suspended panel displays in action.


Why side clamps (and cables) instead of standoffs?
Standoffs look great, but they’re fixed to the wall and every change means new holes.
Cable-suspended clamps solve three frequent pain points people raise in how-to articles about picture/display hanging:
Minimizing wall damage, achieving precise leveling, and making future adjustments easy.
Cable-based systems avoid repeated patching/painting and are simple to rearrange as content evolves (ideas echoed in mainstream “how to hang” guides).
In short: Pro Side Clamps + our cables/cords = a clean, reconfigurable display grid that doesn’t lock you in.
Side Clamps

Standoffs

Single Sided vs. Double-Sided


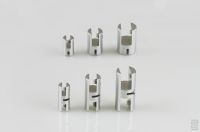
Pro Side Clamp, Single Sided
The Pro Side Clamp, Single-Sided, Green in the image, are designed to grip a single panel. The cable slot is machined into one end of the clamp body for a neat, symmetric look on both faces, an advantage in window displays where viewers see the back of the fitting.
Use four clamps per panel (near the corners) to create a single vertical column, or to “finish” the outer edges of a wider multi-column array.
This illustration depicts the single-sided clamp in green and the double-sided clamps in orange. For a more detailed investigation about this view and spacing for the panels and cables, please view this Design Bulletin document.
Pro Side Clamp, Double-Sided
Pro Side Clamp, Double-Sided are designed to share one vertical cable between two adjacent panels, double-sided clamps minimize the number of cables in multi-column layouts.
In a two or three-column array, use double-sided clamps down the interior seams and single-sided clamps on the left and right edges for crisp margins.

Tip:
When spacing panels in a grid (e.g., real-estate poster pockets or acrylic sign panels), keep vertical gaps consistent and align clamps with visual axes.
The result reads as one intentional, gallery-clean composition.
Picking the Right Size (Small, Medium, Large)
Pro Side Clamp Sizes
Pro Side Clamps come in three sizes tuned to common panel thicknesses and working loads:
- Fits panels approx. 1/32–5/32 in (0.8–4.0 mm).
- Up to 20 lb (9 kg) per clamp.
- Fits panels approx. 1/32–1/4 in (0.8–7.0 mm).
- Up to 30 lb (13 kg) per clamp.
- Fits panels approx. 1/32–3/8 in (0.8–10.0 mm)
- Up to 40 lb (18 kg) per clamp.
Large clamps are slightly asymmetrical by design, the panel slot sits away from the cable set-screw for extra clearance and grip.
Capacity note: the ratings above describe the clamp-to-cable connection. Overall system capacity depends on your panel material, size, number of clamps per panel, and the track/anchor you’re hanging from.
When in doubt, add clamps (load sharing), and test before finalizing.
For additional detail about panel thickness compatibility, view our compatibility guide.

Small Details, Big Payoff: What Makes Pro Side Clamps Different
Finely machined aluminum and clear anodized finish for lasting, architectural quality.
Cable-friendly geometry: a radiused cable slot supports strands without kinking, flat-tip set screws grip firmly yet reduce the risk of cutting cable wires, an upgrade over common cup-tip screws.
Two panel set-screw options included:
- Nylon-tip: kinder to sensitive surfaces (e.g., acrylic pockets, tablet holders, Sintra/foam PVC, some glass).
- Cone-tip: bites gently into tougher substrates for a stronger hold. You can even use the cone tip with through-holes prepared in the panel. The clamp body includes a matching internal cavity for the cone point, resisting lateral forces for a very secure mechanical connection.
Dual cable set screws (Large size): extra holding power where you need it most.
Allen key included: open the box and build.
A Design Bulletin that summarizes these design features, and the following functionality points, is available for download.
Lastly, all the supplied set screws are stainless steel. They will look equally professional well into the future. An Allen key is provided to adjust the set screws so these products are ready to install upon arrival.


Where Pro Side Clamps Shine
Real-world ideas to steal

- Real-estate wall or window: mix portrait and landscape panels, keep the midlines aligned and use double-sided clamps down the center seams for the tidiest look.
- University gallery: build a three-column timeline, add captions on narrow panels staggered between larger images, easy to swap each semester.
- Corporate branding wall: mount acrylic brand pillars and case-study tiles you can refresh after each project phase.
 Real-estate window displays & retail storefronts:
Swap listings, promotions, and seasonal creative without repainting.
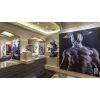
 Corporate lobbies & conference rooms:
Elegant, data-driven boards for project imagery, vision statements and announcements that change often.
 Museums, libraries & schools:
Curated timelines or student exhibitions you can refresh at will.
 Studios & makerspaces:
Process boards and design iterations that evolve over a project’s lifecycle.
Compared with wall-drilled standoffs, you’ll spend less time repairing walls and more time perfecting your layout
Quick-Start:
Designing and Installing a Multi-Column Panel Display

1. Plan your grid. Sketch panel sizes, column count and gaps. Mark where your top rail (or ceiling/wall mounts) will sit.
2. Run vertical cables/cords. For two columns, you’ll use three cables (left edge, middle seam, right edge). For three columns, use four, etc.
3. Add clamps to the first panel. Single-sided clamps on the left and right corners, double-sided clamps along seams that will share a cable with the next column.
4. Level and lock. Slide the clamps to height, use the included Allen key to tighten the cable set screws, then lightly snug the nylon-tip panel screws.
5. Expand the array. Add the second column using the shared middle cable and double-sided clamps, finish the right edge with single-sided clamps.
6. Fine-tune. Step back, check level/spacing and tweak.
7. Future changes. To update content, loosen the panel screws, lift panels out, drop new ones in your cables and clamps stay put.
FAQ
Answers to Questions People Ask Online
- Will the clamps mark acrylic or aluminum panels?
No, use the included nylon-tip screws for surface-grip without scuffing. For maximum strength on tough substrates, switch to the cone-tip screws, or pre-drill through-holes so the cone point seats in the clamp’s internal cavity. - How many clamps per panel?
Four is typical (one near each corner). Very tall or heavy panels may require additional clamps along the sides. For multi-column grids, use double-sided clamps on shared seams to reduce the number of vertical cables. - How do I keep the grid perfectly level?
Cable systems excel here. Hang all panels loosely, step back, then micro-adjust heights and gaps before tightening. Guides for proper hanging height and layout planning in popular decor articles echo this approach to careful measuring and adjustment. - What about wall damage?
Because panels hang from cables, you aren’t drilling every panel location, the panels simply float away from the wall. You mount a track or pier once, then rearrange endlessly, helpful for renters and facilities that want fewer repairs between exhibits.
Spec Snapshot (at a glance)
- Compatibility: works with all AS Hanging cables and cords.
- Types: Single-Sided (edge panels) and Double-Sided (shared-cable seams).
- Sizes: Small (1/32–5/32 in), Medium (1/32–1/4 in), Large (1/32–3/8 in).
- Materials & finish: machined aluminum, clear anodized.
- Included: stainless set screws (flat-tip for cable, nylon-tip & cone-tip for panels) + Allen key.
For detailed part selection and compatible tracks, cables and accessories, explore our Compatibility guide
Ready to design your display?
Our specialists can help you spec the right clamp sizes, cable count and track choice for your substrate and environment. If you have questions or would like to learn more about how our products can be beneficial in your project, contact our Customer Support at [email protected], or give us a call at 866-935-6949 (toll free) or at our local number 450 619-7999.
When you hang with AS Hanging Display Systems, you Hang with the Best®
Explore our Picture Hanging Systems built of tracks, cables and hooks.
We offer picture hanging hardware for your residential, commercial and institutional projects.