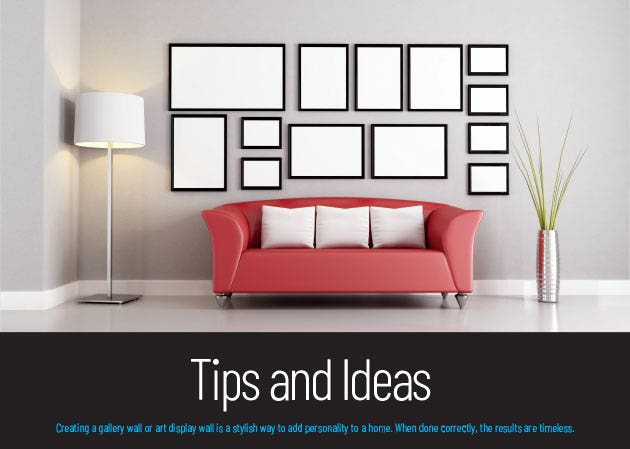
Creating a gallery wall or art display wall is a stylish way to add personality to a home. When done correctly, the results are timeless. This type of display holds up over time, and you will find yourself satisfied with your picture wall for years to come. Better yet, with the techniques we will reveal to you in this article, you will find you can make changes to the layout and design at any time. No longer must you avoid changing your display because of the damaging holes caused by nails.
The Dos and Don'ts of Creating Wall Displays
It used to also be very intimidating! Where to start? How to lay out your collection of pictures? Chill. There is no pressure on you to get it right the first time, or the fifth time for that matter. So, instead of asking how to hang pictures, let's just do it. First of all, the Internet is full of articles all about supposed proven and magical methods for planning your layout. It is suggested you cut out craft paper shapes of the various frames you want to hang, and tape them to the wall. Then experiment with various layouts. Next, when you have your design settled, remove the cutouts and replace them with the actual framed photo or art. Here is an example from Pottery Barn.

Here is a photo of the process in action and the final results.

Here is a fine example that was written up in Better Homes and Gardens.

However, all is not good. There are several issues that are ignored by the "cutout and tape" approach. Can you visualize a photo or art piece from a rectangle of craft paper? Only a few of us could answer a truthful "yes" to that question. Most, on the other hand, would find it much easier to actually play with the real framed objects during the "what if" stage. Stay tuned because our solution allows just that. Another issue is in replacing a cut out with an object. The wall art arrangement in the above photo from Better Homes and Gardens will only look correct if the spacing between the frames is executed flawlessly.
And since each art object is prepared on the rear side slightly differently, it is very difficult to transfer the exact location of the cutout to the framed object. Trial and error is not going to work well when each trial means another hole in an otherwise perfectly fine wall. An article in Southern Living magazine attempts to address this dynamic. See the next photo below. The caption for this photo reads, Once you have an arrangement you like, mark the spot on the craft paper where the nail will go. Hammer in the nail, and then take down that paper.

Notice how it takes two to accomplish this step. Notice how the hang wire on the back of the mirror is not fully stretched. In fact, this technique is an approximation of where the mirror will be located. It is nearly impossible to accurately locate the mirror exactly where the cutout of the mirror was located. Those variations do add up and will show in the execution. But what if there was a way to avoid dealing with the cutouts altogether? Again our solution addresses this difficulty. Since there are no cutouts in our approach, there is no problem with transferring the exact location of the cutouts to the actual item.
Lastly, this whole approach of driving a nail (or more than one) into your wall for each frame requires confidence - confidence that you will not want to make any changes. What happens when you come across the next piece that must be added to your collection? Do you start over by patching and painting the wall? Do you do this each time you wish to add an object to your art wall/photo wall? Or do you, as I trust many would, avoid the whole mess altogether? Once the wall arrangement is set, it might as well be set in stone. How about if there was a way to avoid the damaging holes caused by nails?
That would be something!
So let's recap the promises of a different approach.
- Make changes to the layout and design at any time.
- A method that will allow us to play with the actual framed objects during the "what if" stage.
- Avoid cutouts altogether so there is no location transfer error.
- Never use nails so there is no damage to walls.
The answer to all these promises is the same single solution, a hanging system. Hanging systems are all about allowing you the freedom to design, the freedom to change your mind, and the freedom to add or remove an object at any time.
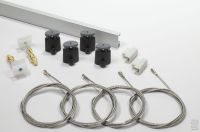
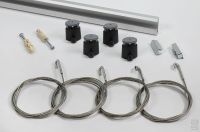
AS Hanging Display Systems offers various tracks meant to be installed on walls, ceilings, etc.
Freedom: The Value of a Hanging System
A Hanging System is comprised of a track mounted high on the wall, typically at the intersection of the wall and ceiling. From this track hangs cables or rods that follow down the surface of the wall. Photos, art, posters and mirrors are hung from the cables or rods via hooks and fittings. There are no nails in the walls. The real value of such a system is that any wall grouping can be changed infinitely. This allows you to design wall displays and set up an art wall with the actual items, not cutouts. Furthermore, you will perform your what if studies with the actual items. You will be able to see if the art piece, with the heavier colors, works best near the lower portion of a wall grouping where it supports the objects with a lighter appearance above it, for example. Settled. Hanging systems are the way to achieve easy and versatile picture wall displays.
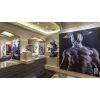
Perfect example of the versatility of a Hanging System

Update your wall Art without any damage to walls

Tips for Selecting Content for Display Walls
Now that we have discussed the best method for the mechanics of how to hang a picture within an art wall display, let's move on and discuss techniques for creating a good looking arrangement. Gallery walls are a great way to add interest, pattern, color, or to enhance a theme within a room. However, there are several common tricks you can use to establish an arrangement that visually works. These are time-tested tricks and they can typically be used together.
Use black and white photography to limit the color variables you would otherwise need to balance within a decor. If you have ever attempted to balance the various myriad of colors such a number of photos would present, you will appreciate immediately how effective this solves a rather difficult issue. It is easy to convert color photos to B&W in this digital age, and this technique even disguises issues many older photos have with fading and yellowing.

Use a common element in photo frame construction. Black is the obvious choice here and it is particularly effective if the color repeats in other room accessories such as the banister and skylight above. It is a powerful tool even when there are large differences between the object sizes and frame content, as below.

Black, however, is not the only frame color choice. Another approach is to repeat the room color palette. The below design repeats the soft warm tones of the walls in the natural wood frames. The frame mattes are repeating the white tones in the furnishings and white trim finish.

Feel free to apply liberal-sized frame matting. So many photos in our vintage collections of family or travel photos are small, in the 4 x 6 inch range. Even an 8 x 10 looks quite small when mounted on a wall. Use mattes to enhance the physical size of your photo collection to make them wall worthy. Besides using common frame colors and black and white photography, you might think of elements that enhance a theme. Framed vintage maps are an example of a unified photo or art gallery wall in the next image.

Children's artwork is another way to go, and many of us have an ample supply. There are also other benefits. This genre is inexpensive; and just think of the pressure you might remove from your kitchen refrigerator.

Another way to address the desire to display children's art is to not frame it at all. After all, this genre is often very fleeting and your little Picasso may be wildly enthusiastic of their next creation, tomorrow. Instead of framing, simply insert the masterpiece in acrylic sleeves, which are pre-installed on a wall. The sleeves open at the top for easy insertion and removal of photos, drawings and documents.

Acrylic Pockets are attached to tensioned cables. The cables may be supported by either of standoffs (as in the photo above) or tensioned between two parallel tracks.
How to Arrange an Art Wall Display
Even though you now realize a hanging system will greatly facilitate the mechanics of setting up an art wall, and though you know the most powerful tricks to selecting materials for your art display wall, you may feel you still need inspiration for arranging the pieces. Just as Houzz.com, or Pinterest, are great web destinations for collecting home décor ideas, there are many web resources for priming your creative juices for an exciting wall arrangement. Pottery Barn also offers several useful tips and suggestions.
When using a hanging system, there's no need to start with a paper template, as they suggest, you can still create any of these layouts!

There are any number of web sites that offer templates and designs suggestions. Here are some great ideas for Gallery Walls shown with Room Vignettes. The following image is from Lushome.com.

The following image is from an Etsy.com dealer, What Marvelous Things. It shares some great ideas for gallery walls shown with room vignettes.

And this one from JennaBurger includes quite a volume of similar idea builders. Simply perform an image search for wall display templates on your favorite web search tool to see a large number of additional ideas.

So, whether your challenge is in setting a residential art wall or a larger corporate branding gallery display, start with a hanging system and make your project easier to design.
Make it easier to maintain and make it sustainable.
But best of all, allow yourself the freedom to change the display as frequently as you desire.

If you have questions, need picture hanging help, or would like to learn more about how our products can be beneficial in your project, please contact our Customer Support at [email protected] or give us a call at 866 935-6949 (toll free).
When you hang with AS Hanging Display Systems, you Hang with the Best®
Creating a gallery wall or art display wall is a stylish way to add personality to a home.
When done correctly, the results are timeless.
Explore our Picture Hanging Systems built of tracks, cables and hooks.
We offer picture hanging hardware for your residential, commercial and institutional projects.