Recently, one of our customers shared a photo story with us about his in-depth room makeover project. This opportunity came when a child moved out of the home. The project was to refresh the space and convert the room to an in-home office. The entire project would include installing new windows, crafting all new finish carpentry to include baseboards, chair rail, window and door casements, mounting Click Rail Track behind a beautiful crown molding ceiling and a new paint job. The customer's commentary for the crown molding ceiling/Click Rail Track portion of the project is shared below. We found proceeding through the makeover process in this photo story a fun and informative way of learning how to undo the markings of the past and move to a room with sophistication, creative flair, and design freedom for whatever the future brings.
We hope you enjoy the journey as well.

Time to patch damage caused by years of hanging objects conventionally.

There is quite a bit of labor coming, so save where you can. Crown molding will hide the top wall edge, so I chose to save the paint and the effort of cutting in at the upper edge.

Windows casements and chair rail are complete. On to the crown molding ceiling.

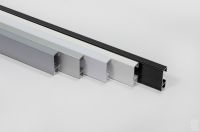
The first step was to determine how much of the Click Rail Track I wanted to expose behind the crown molding ceiling.

I cut a block of scrap wood to use as a gauge. This helped me to position the track at the same distance from the ceiling in all locations. Note that the gauge is against the track clip and not the track itself.

I marked the wall where each connector needed to be placed according to AS Hanging Display Systems' Installation Instructions.

To locate the studs, I used a stud finder. I placed the connectors at studs whenever possible. These were drilled with a small pilot hole only. Where no studs were present, the hole was drilled larger to accept a screw anchor.

Next, I inserted screw anchors, supplied with the track, into the now larger holes.
NOTE: If I were to do this again, next time I would mount the connectors a bit higher on the wall. While this would hide more of the track behind the molding it would also make it much easier to fasten the connectors to the wall. Each of the screws holding the connector clips would be based in wood as they would each contact the wall header. Not a single plastic screw anchor would be needed.

Then, to each hole I applied a connector (clip) with the supplied screws for the first track length.

Then I just snapped the track over the connectors. It was really quite easy.

When I reached an inside corner, I made certain to insert the Corner Connector to the track end before mounting it to the wall.
NOTE: I found that Corner Connectors add to the difficulty of finishing corners nicely. If you have enough skill to take on the mounting of crown moldings with mitered corners, you probably have the skills to mount the track without Corner Connectors and mitering the track corners as well.

I continued this process until I had run a lap around the entire room.

Next, I began adding the crown molding ceiling. I used a very light-weight synthetic molding, which worked quite well.

The crown molding was held in place with a bead of construction adhesive on the track where the molding would come in contact with it - and an occasional finish nail.

Next, I installed the crown molding ceiling. Here you can see the molding reaching an outside corner and the difficulties with placing molding over the Corner Connectors. (This is a view from below the track looking up.) 
All that was left to do was fill the holes and caulk the gaps. I went ahead and caulked the seam between the track and molding as well.
This creates a very nice, finished look. I used a paintable and flexible caulk for a smooth finish. Since these are made of different materials, the caulk will keep the paint from cracking at the seam between the track and molding.

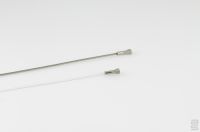
The result is a hanging and display system the blends into a space and is nearly invisible. Here, I attached two Nylon Twist-End Cords to the Click Rail Track to hang an old storm window.

I attached Mini Hooks fitted on the Nylon Cords, to D-Rings. These D-Rings were attached directly to the wooden frame. By placing the attachment point very high on the object, it helps it hang very straight. This was a recommendation from the folks at AS Hanging Display Systems.

Since then, I took another look at this object and decided to add AS Hanging Systems' Bumpers to the window, one in each of the lower rear corners. The window now appears to float on the wall.

This mirror was suspended over a set of drawers from Ikea. I don't think many people would notice it was hung without nails. However, what I like is that after all the labor I put into refreshing this room, I am not married to the location of the furnishings. I can make changes. Objects can be moved on the walls. There is no harm or damage to the walls, as when using nails. This is a very liberating experience.

Immediately below an awning window, in a small alcove, is a leather chair and Victorian-style side table that defines a small reading space. On the wall is a piece that may survive this location or not. But the flexibility to decide at a later time is what I find so gratifying. Thanks for allowing me to share this adventure with you. The system is fantastic and we love how it fits into our taste for a different era. I know we've enjoyed the journey, and the well-detailed instructions, shared in this room makeover. We love hearing our customers' experiences.
Did you know that a Click Rail Track could be so beautifully implemented into classic crown molding ceiling?
Where might you design a space with such sophistication - and functionality?
If you have questions or would like to learn more about how our products can be beneficial in your project, please contact our Customer Support at [email protected] or give us a call at 866 935-6949 (toll free).
When you hang with AS Hanging Systems, you Hang with the Best®